 English -


Although Train Director was inspired by Train Dispatcher, it now has many
more functions. In this page are described all the features of Train Director.
Scenario creation is described here.
This page is specific to version 3 of Train Director.
The screen
When Traindir starts, a screen similar to the following is shown:
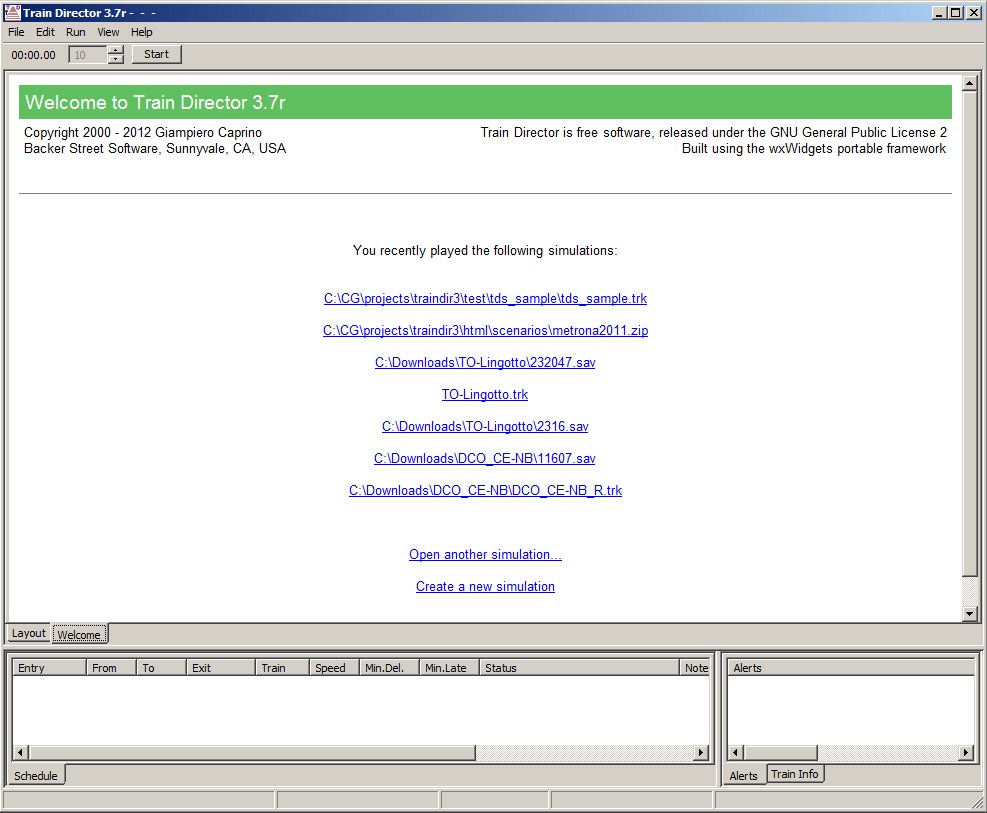
The first time one runs Traindir, there won't be any file in the list of recent simulations.
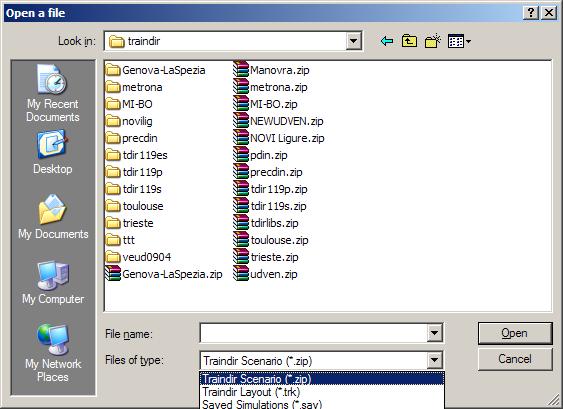
Through the menu item "File+Open..." it is possible to load one of the scenarios present on the disk.
It is also possible to download from the Internet scenarios created by other people, or to create your own layouts with the Edit function.
Typically the scenarios found on the Internet are packed in ZIP files. Traindir is now able to read the content of compressed files directly, without the need to uncompress the files in their own directory. Obviously it is still possible to read uncompressed scenarios by loading the layout file (files .trk).
Once a scenario is loaded, you can see several areas of the screen which are dedicated to different functions:
-
the menu and the status area: the menu commands can be activated with the
mouse or using Alt + the underlined letter, just the same as in every other
application's menu:

The status area is used to show the simulated time, the simulation speed and the alert messages. The numbers in the window's header, next to the time multiplier, show how many trains are running (R), how many are ready to enter the territory (r), how many are waiting at a signal (w), how many are stopped at a station (s), and how many have arrived at their destination.
-
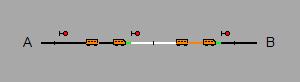
the layout of the line(s):
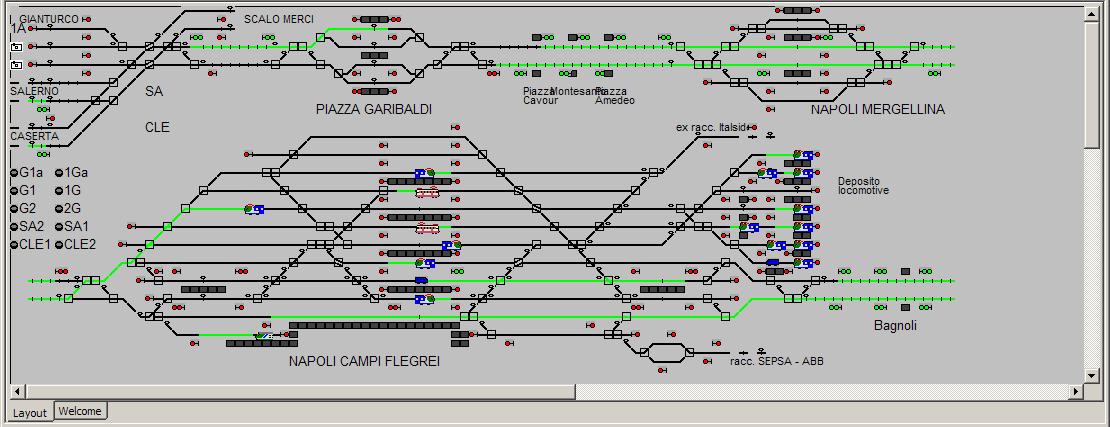
where the program shows the position of all the trains that have entered the territory at that particular moment, plus the state of each signal and switch.
-
the information panes, mainly the
general schedule:
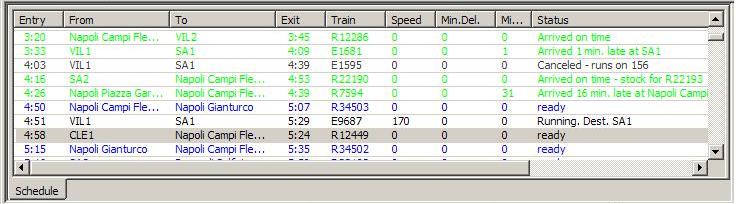
In the general schedule pane is listed for each train the name, the entry point and the entry time, the intended exit point and exit time, the current speed (if present in the territory), the cumulative number of minutes the train has been late arriving at stations, and the number of minutes the train had to wait to enter the territory (for example because the entry point was occupied by another train). In short, users will not need to keep looking at a cuckoo clock to see if trains are arriving on time.
By clicking with the right button of the mouse in the general schedule pane, you can set some paramters: it is possible to show or hide those trains which don't run of the specified day, to make the schedule less crowded.
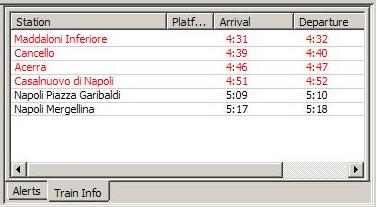
By double-clicking on a train entry in the list, its time table will be shown in the lower-right pane:
Since certain simulations require a lot of screen space, Train Director 3 allows to separate the general schedule pane, so that the maximum space can be reserved for the layout of the territory. Using the "View" menu, it is possible to select where one wants to show the general schedule. By default, the "Timetable in split window" is selected, where the general schedule is shown in a pane of the main window.
Selecting the "Timetable in tabbed window", the general schedule is shown behind the layout window; to show it you need to select the "Schedule" tab, or use the "Ctrl+Tab" key combination, or use the "F4" key.
When the item "Timetable in separate window" is selected, the general schedule is shown in its own window, as was the case in Traindir 1.x: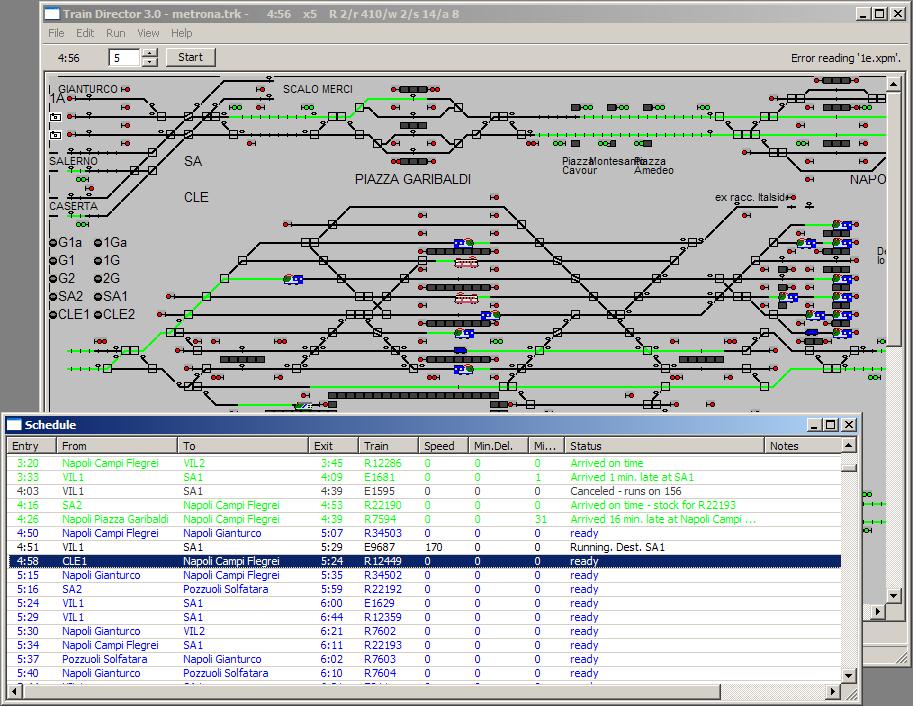
Note that in these last 2 cases you lose the ability to see the Alerts list and a specific train's timetable.
Once loaded a territory, you can start the simulation.
The simulation
By using the menu command "Run+Start", or simply by clicking on the "Start"
button, or with the keys Ctrl+S, you start/stop the timer, which will advance
according to the time multiplier specified on the screen. If the standard
simulation speed (10x) is too high, you can reduce it by clicking on the low
arrow shown next to the time multiplier (or using the Ctrl+Z key), down to a 1x
value, meaning one clock second = 1 simulation second.
If the simulation speed is too low, you can increase it by clicking on the up
arrow shown next to the time multiplier (or using the Ctrl+X key), up to 300x,
that is 1 clock second = 5 simulation minutes. This is useful to quickly skip
hours when there are no trains in the territory.
Obviously the purpose of the simulation is to direct the trains to their correct destination. To do this, it is necessary to carry out the following tasks:
- throw the switches to direct the trains. Every time you click on a switch, the switch will turn. You cannot throw a switch that is protected by a green signal.
- allow the passage of the trains by turning the signals to green. When you click on a red signal with the left button, the signal will turn to green, provided that the path to the next signal (or to the end of the line) is not occupied by another train, and that all the switches allow the passage of the trains. Clicking on a green signal the signal will turn back to red.
- in the scenarios that allow it, the two above actions can be combined by using the itinerary buttons, which automatically turn the switches and open the signals.
- Enable the automatic block signals, so that it is not necessary to put these signals to green after a train has left the protected block. To do this, it is necessary to click with the right button on a double-light signal that has been previously put to green. The signal will turn from green+red to green+green. These signals normally are in a green+green state, and turn to a red+orange state while a train is occupying the track block protected by the signal. When the train has left the protected block, the signal automatically turns back to green+green.
- To change the direction of a train when the train is stopped at a station or at a signal. This is useful when a train has been sent in the wrong direction or when the train arrived from a direction and moves on to a line branch in the same direction. To change the train direction, click with the left button on the train icon on the layout. You must wait for the train to stop at a station or signal before you can change its direction,
- To shunt a train, thus at a reduced speed, until the train reaches the next station (or the train yard). To do this, click with the right button on the train image. The train status will change from "Arrived" to "Shunting" and its speed will be limited to 30 Km/h. This can be useful to free up a platform in a station to allow the arrival of another train.
-
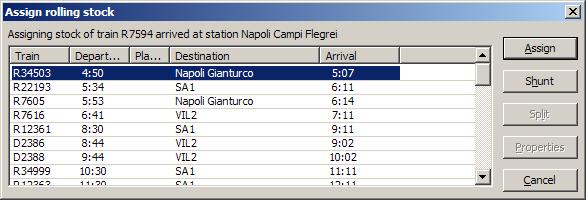
Assign the rolling stock when a train has arrived at its destination
station to another train. To assign the rolling stock, you must click on the
train's icon with the right button, then you must select the train you want to
assign the stock to from the list of trains departing from the station where the
arrived train is at that moment:
Rolling Stock Management
Version 3.4 of Traindir introduces the notion of stationary rolling stock, that is rolling stock un-attached to a running train.
A stationary rolling stock is left on the layout when a train is split in two parts from the "Assign" dialog. When the user clicks on the "Split" button in the "Assign" dialog, the head of the train is sent forward at shunting speed (30 km/h), leaving behind the tail of the train (i.e. the car's icon becomes separated from the locomotive's icon).
The head of the train will continue at 30 km/h until it reaches the next station, or until it exits the layout.
The car will remain on the track until one of two conditions occurs:
- It is assigned to another train, again through the "Assign" dialog.
- It is merged to an incoming train, thus "becoming" part of that train.
Merging trains is performed by allowing a shunting train to cross a red signal onto a track where another train, or a stranded rolling stock, is waiting. Clicking on a red signal while holding the control key will reserve the protected track for the shunting train (the track will become white). The shunting train will then proceed until it joins the waiting train.
Penalties
During the simulation it's possible that penalty points will be assigned, for example because a train is late arriving at stations. You can show the accumulated penalties up to that point in the simulation by using the command "Run+Performance". The following summary page will be shown, listing the current number for each of the penalties, and the status of each train:
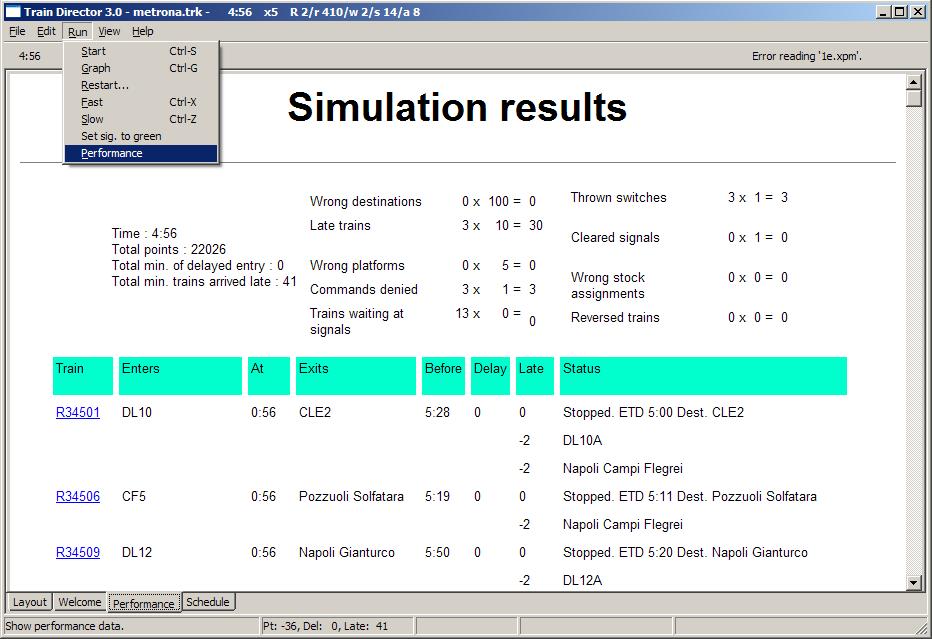
The penalties can be assigned for the following reasons:
- "Wrong destination": a train has been sent to an exit point (or a final station) which is not in its time table.
- "Late trains": a train arrived late at its destination.
- "Wrong platform": a train has been directed to a station platform different from the one specified in its timetable.
- "Commands denied": you tried to perform a command which would have created a dangerous situation (for example you tried to throw a switch while that switch was protected by a green signal, or you tried to clear a signal to green while the protected track block was occupied by a train).
- "Trains stopped at signal": you didn't clear a signal to green in time, causing a train to stop at that signal. Sometimes this condition cannot be avoided; for this reason often there are no penalty points assigned for this case.
- "Turned trains": you requested a train to change its direction twice (thus turning the train back towards its original direction).
- "Thrown switched": you threw a switch twice, without a train crossing the switch.
- "Cleared signals": you cleared a signal to green, then you turned the signal back to red, without a train crossing past the signal.
- "Wrong stock assignments": you assigned the rolling stock of a train to a different train than specified by the timetable.
From this page it's also possible to show the time table of individual trains by clicking on the train's name.
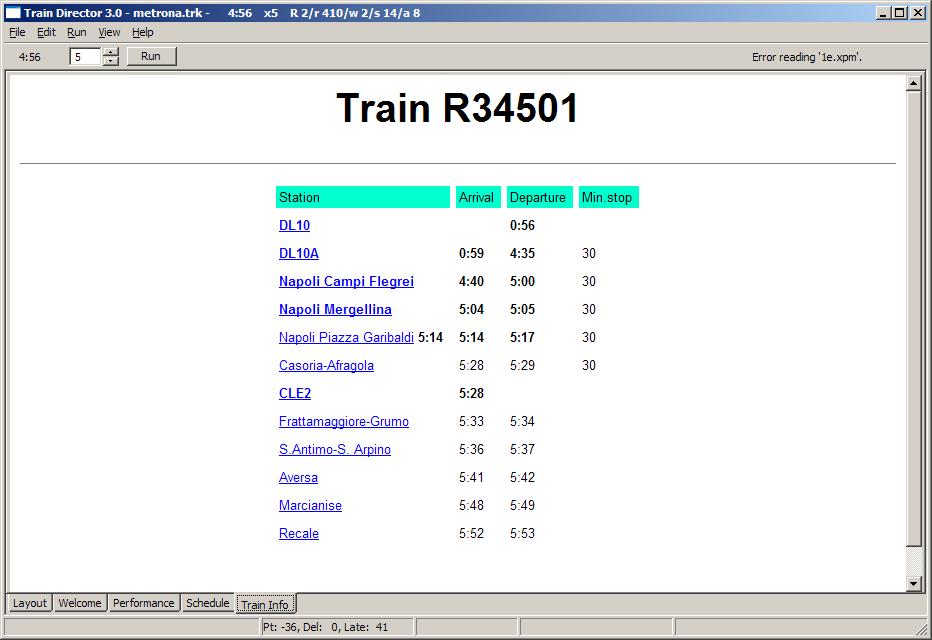
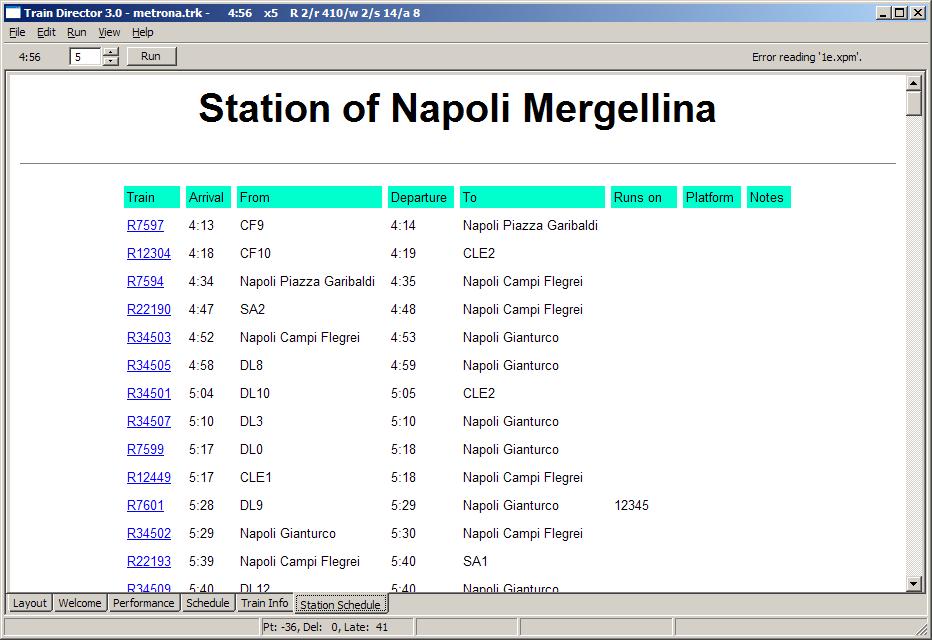
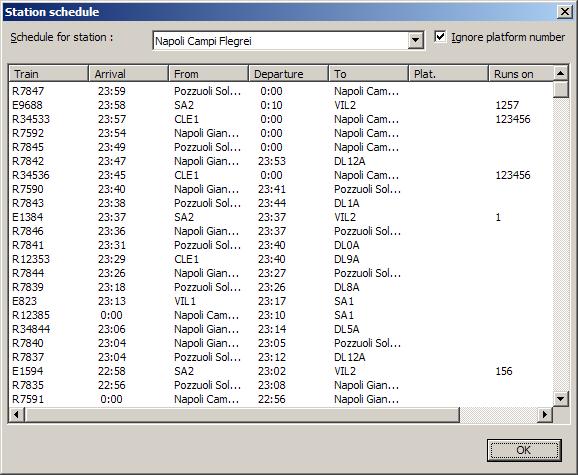
From a train's time table page it's possible to show a station's schedule by clicking on the station's name:
When one of these 3 pages is shown, meaning "Performance", "Train time table" or "Station schedule", you can print the content of the page by using the menu "File+Print...". You can then refer to the printout for a future simulation.
Another way to show a train's time table and its properties is to click on the train's image on the territory while pressing the "Shift" key. You will see the following dialog:

On this dialog you can see additional information, such as the train's type (1,
2, 3 or 4), whether the train's rolling stock comes from another train ("Wait
arrival of train"), whether this train will provide the rolling stock for
another train ("Stock for train") and in which days the train runs ("Runs
on...", 1 = Monday, 7 = Sunday).
Similarly, it's possible to show a station's schedule by clicking on the track element of the station while pressing the "Shift" key:
Other functions from the "Run" menu are:
- "Run+Graph" shows a graphical representation of the time and space travelled by each train. To take advantage of this feature it is necessary that the distances between the stations be specified in the layout -- see the edit mode for more details.
- "Run+Station schedule" shows a list of the trains arriving and departing from an individual station. This is useful to check for yielding trains, or to decide the order of arrival of trains in a station. This feature is also accessible by Shift+right-clicking on the station's track.
- "Run+Set sig. to green" turns all the automatic block signals to green. Protection or departure signals are not affected. Note that the program checks that the path protected by each automatic block signal can legally be turned to green.
During the simulation it is possible to change some features of the simulator by using the menu "Edit+Preferences", which shows the preferences window:
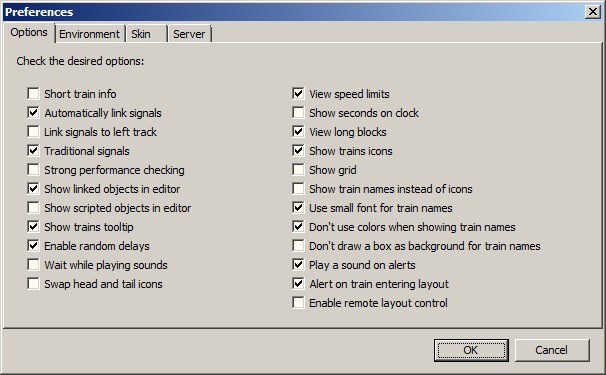
By clicking on the check-box one can enable or disable the following features:
- "Short train info" - Selects a shorter description on the status line of the train pointed by the mouse.
- "Status line at top of window" - Shows the status line above or below the layout.
- "Alert sound on" - Enables the use of a beep when there's a new alert (such as when a train stops at a signal).
- "View speed limits" - Shows on the layout (with a small circle beside the track element) all the points where a new speed limit takes effect.
- "Automatically link signals" - in Edit mode, automatically links the signals placed on the layout to the track element to the right (in the running direction) of the signal.
- "Show grid" - shows a grid that identifies every single coordinate on the layout. This can be used to facilitate the placement of new track elements while in Edit mode.
- "View long blocks" - show (using a small dash which crosses the track) the track elements that are longer than 100m. Obviously, a train will spend more time on those track elements, according to the track length.
- "Show seconds on clock" - shows the seconds on the simulation clock. Normally, only hours and minutes are shown.
- "Traditional signals" - use standard icons for the signals. In the future, individual scenarios will be able to specify icons that are specific to the railroad company that manages that line
- "Strong performance checking" - changes the points assigned to certain penalties, so that it is more difficult to run a "clean" simulation.
- "Show linked objects in editor" - draws a line between an object (a signal, entry/exit point, final tracks) and the corresponding linked track element (see the description of the editor).
- "Show trains tooltip" - Show train information when the mouse hovers the train's icon in the layout.
- "Enable random delays" - Enable random delays for trains if the scenario was created with this feature.
- "Wait while playing sounds" - Stop the simulator when a sound is played - for example when a train enters the layout.
- "Swap head and tail icons" - Swap train's head and tail icons. By default when a train's direction is reversed, the locomotive's icon point to the new train's direction, which is not necessarily what happens in reality. This option keeps the tail car icon as the head of the train, and keeps the locomotive's icon at the tail of the train.
- "Show trains icons" - Show icons for the head and tail of the train. By disabling this option, the only indication of the train's position is the red color on the track occupied by the train.
- "Show train names instead of icons" - Show the train's name in place of the train's head and tail icons.
- "Use small font for train names" - Use a smaller font when showing the train's name on the layout. The size of the find is the same a layout cell, thus preventing the name from overlapping signals and other indicators present to the side of the track.
- "Don't use colors when showing train names" - Don't use different colors for different train types when showing train names on the layout.
- "Don't draw a box as background for train names" - Don't show a colored background when showing train names on the layout. Instead, just draw the name and a gray (transparent) background.
- "Play a sound on alerts" - Alert the player that an event has occurred.
- "Alert on train entering layout" - Play a sound when a train enters the layout.
- "Enable remote layout control" - Enable control of the simulation from a web browser. This feature is described in more detail on the Remote Web Access page.
If distance information is available in a scenario, the player can use the Time-Distance Chart
to see where to stop trains to let by incoming or faster traffic.

This page is maintained by g_caprino@gmail.com
(remove the _ before sending your message.)
Created on: August 6, 2000